|
|
 发表于 2015-2-10 19:40:28
|
显示全部楼层
本帖最后由 seekfor 于 2015-2-10 19:41 编辑
c7 @" E9 ~3 z9 _8 l' [* N" L7 M4 b. L. E" o) e6 W5 d- E9 e+ D
其实人家图纸根本没有错,你想歪了。
6 V( {5 b0 M0 Y3 J1、从这个视图看过去那根线就是表示的那个表面,注意(默认的basic dimension 90°)。并没有你所表述的、歪成那样的位置下(basic dimension 不为90°)再评价垂直度。我觉得你把这个垂直度理解为平面度了。" c2 r% F Q. e$ A
附上一些尺寸的基本原则:
7 p( Y2 s& Q5 f' c( k. w0 b& ca) Each dimension shall have a tolerance, except for those dimensions specifically identified as
" F- q) @9 Z# f+ K/ v: g5 G" w# `reference, maximum, minimum, or stock (commercial stock size). The tolerance may be applied directly
) P* o; y& j, @( y4 t, u1 Hto the dimension (or indirectly in the case of basic dimensions), indicated by a general note, or located in. O" a0 {' x9 b9 d( U
a supplementary block of the drawing format. See ANSI Y14.1., R6 w0 q, N* w! N1 \
(b) Dimensioning and tolerancing shall be complete so there is full understanding of the characteristics of each feature. Neither scaling (measuring the size of a feature directly from an engineering- I& T- m4 c9 [6 J1 Q
drawing) nor assumption of a distance or size is permitted, except as follows: Undimensioned drawings,
6 l4 C# _; w6 L# B( R9 X# ysuch as loft, printed wiring, templates, and master layouts prepared on stable material, are excluded1 @- F+ | y! Y' @3 Q
provided the necessary control dimensions are specified.5 t- J# y: U2 e8 F. y
(c) Each necessary dimension of an end product shall be shown. No more dimensions than those/ h7 f0 ?" q5 h' u$ P/ B+ y
necessary for complete definition shall be given. The use of reference dimensions on a drawing should
. t. L& x, s! U ybe minimized.
8 b6 [- @4 Q L3 _(d) Dimensions shall be selected and arranged to suit the function and mating relationship of a part
' Y1 A; v& q' Q v9 l' ? U* Dand shall not be subject to more than one interpretation.7 {8 E6 T8 [: P! f
(e) The drawing should define a part without specifying manufacturing methods. Thus, only the
! M+ [! v' }7 X/ X1 q7 idiameter of a hole is given without indicating whether it is to be drilled, reamed, punched, or made by any. R6 O6 q+ H* m; L
other operation. However, in those instances where manufacturing, processing, quality assurance, or0 a+ Q q; C# c0 {, K' F0 x
environmental information is essential to the definition of engineering requirements, it shall be specified on the drawing or in a document referenced on the drawing.: ]# Q! |+ s- j/ N4 o- c d, v
(f) It is permissible to identify as nonmandatory certain processing dimensions that provide for
, n2 T) j# h* zfinish allowance, shrink allowance, and other requirements, provided the final dimensions are given on
; S4 G' G. X" @; Q# [4 X7 Mthe drawing. Nonmandatory processing dimensions shall be identified by an appropriate note, such as; k9 j/ i0 j6 k3 a, d3 A
NONMANDATORY (MFG DATA).* a% T" b& L$ b0 Q
(g) Dimensions should be arranged to provide required information for optimum readability. Dimensions should be shown in true profile views and refer to visible outlines.
- s: v1 Q4 q* G* U: M( }3 C+ B1 T(h) Wires, cables, sheets, rods, and other materials manufactured to gage or code numbers shall be
* Y' ^4 M# a1 a" m" wspecified by linear dimensions indicating the diameter or thickness. Gage or code numbers may be
# P* C' V" t P8 T" i) mshown in parentheses following the dimension.! h4 Z' ~5 |0 }5 ~
(i) A 90° angle applies where center lines and lines depicting features are shown on a drawing at
' D: O; T3 X2 I- b9 t8 p* g! K9 Yright angles and no angle is specified. [6 }% g) U7 ] D4 u+ |8 L
(j) A 90° basic angle applies where center lines of features in a pattern or surfaces shown at right
1 b. M- q: i% i1 X% L/ Sangles on the drawing are located or defined by basic dimensions and no angle is specified.
; ?7 `+ w5 g6 ~) F(k) Unless otherwise specified, all dimensions are applicable at 20°C (68°F). Compensation may be. V) Z l) @. r2 v
made for measurements made at other temperatures.
4 |5 \* ]; R* _(l) All dimensions and tolerances apply in a free state condition. This principle does not apply to+ F7 _6 W) C x% _
nonrigid parts as defined in section 5.5.
1 L! f" ^8 Y" ~- A8 R8 T(m) Unless otherwise specified, all geometric tolerances apply for full depth, length, and width of the
6 i* C' z& w% W, z6 h, p. O2 Ffeature.
% T8 j8 B, c/ K O0 n) T) k! D(n) Dimensions and tolerances apply only at the drawing level where they are specified. A dimension( F: N$ ~% L# p. {& l. M2 `
specified for a given feature on one level of drawing, (for example, a detail drawing) is not mandatory for
4 d) w+ [( [! i Z, Zthat feature at any other level (for example, an assembly drawing)
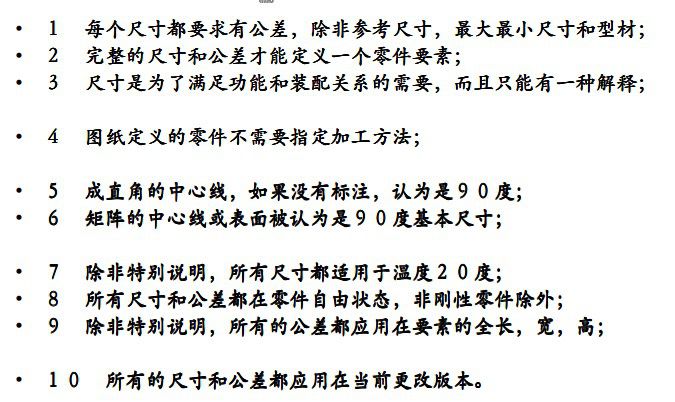
2 l+ V6 W; ?9 B4 r# ?# U& Q+ p一下是其中一个中文PPT中的,中文的仅供参考,翻译不全感觉,也感觉不是很贴切愿意。8 n" a; {( h& H9 B6 ?
8 @0 C! W5 B5 Z3 \" ~' v% ]
% v9 A ]8 I8 g6 l B4 s+ v
/ [6 _6 ?) _$ m- s, C9 u6 M1 v& D" m: W5 g+ _$ W. n% V- b% E
|
-

|